It's 4am, and I'm sound asleep dreaming of robots when I'm startled awake by 10 lbs of hungry cat jumping on my face with a pleading "mew". I get up, feed the cats, and unsuccessfully attempt to resume my slumber. This scene repeated itself every day for only a couple weeks before I decided I needed an automatic cat feeder to maintain my sanity.
The feeder needed to only handle dry food, be able to ration food quantity so that the cats wouldn't get fat, and it needed to have a lot of storage so that the cats wouldn't starve while my wife and I were traveling. Similar off-the-shelf feeders cost upwards of $50, and I like a challenge, so I set out to build one myself.
Build details and more pictures after the break.
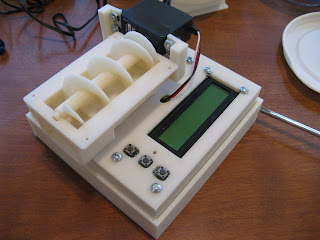
After some research, I decided on an auger-style mechanical design - the food would be held in a hopper, with a hole at the bottom that opens to the top-back of the auger chamber.
As the auger rotates, it pushes food forward to an opening at the front-bottom of the chamber, falling out into the cat food bowl.
Pretty simple, right? Not so much. My initial design didn't have a large enough output opening, so cat food would jam at the front of the opening. Once that was fixed with a little dremel magic, the problem became that cat food is a lot stickier than I expected. The feeder would meter out a few ounces of food just fine, but then would stop - the auger still rotating, but no food in the auger chamber.
Food would fall until kibble-to-kibble sticktion overcame the force due to gravity. The food in the hopper wouldn't fall - there was a little cave directly over the hopper input.
I tried a couple of solutions - one being a piece of wire that hangs down into the auger chamber, disturbing the kibble cave as the auger moves. This worked a little, but ultimately only made the kibble cave larger. I ended up re-designing the whole assembly so that the auger and auger chamber are much larger, so that kibble sticktion isn't strong enough to allow a kibble cave of that size to form.
Once the mechanicals were done, the electronics were built using a hand-built Arduino compatible circuit, a DS1302 RTC, and a serial LCD with a few buttons for menu and settings.
The whole thing runs off of a wall-wart. The software is pretty simple, incorporating a menu system to set system time, and setup feedings. The system stores feeding times and quantities in EEPROM, and there is a battery backup for the RTC so that even if there is a power outage, nobody is going hungry.
All design files are listed below:
Cat Feeder Schematic (Eagle)
Cat Feeder STL Files
Cat Feeder Parts Designs (Inventor)
Cat Feeder Firmware (Arduino)
Cat Feeder BOM (Excel)
Friday, September 2, 2011
Automatic Cat Feeder
Labels:
3D modeling,
Arduino,
circuits,
Code,
design,
food,
machines,
Maker,
rapid prototyping,
robotics
Subscribe to:
Post Comments (Atom)


Hi Ryan Meuth
ReplyDeleteI want to test the said circuit in order to learn electronics as my hobby and for my pleasure of amazing working of the program. Even though please do forward hexfile (for atmega8 use project Automatic Cat Feeder) to me via my email. I do hope to have your kind assistance to complete my test and I wish to express that your idea on the project is so interesting homepage and I will follow your update further
Thank yery much
Best regards
suvit_0118@yahoo.co.th
thailand
Like this. I got difficult to make the augers. but at all thx alot
ReplyDeleteI don't have the skill to solder all electronic components. In theory I should be able to get an off the shelf programmable electronic timer and connect with the rest of your assembly, right? What is the spec on the rest of our assembly (auger, auger tube, motor)?
ReplyDeleteThanks,
Kit
Super-Duper site! I am Loving it!! Will come back again, Im taking your feed also, Thanks.automatic animal feeder
ReplyDeleteWhat motor did you use to drive the auger?
ReplyDeleteNice articles and your information valuable and good articles thanks for the sharing information Cat travel comfort items
ReplyDeleteNice articles and your information valuable and good articles thanks for the sharing information senior dog food with joint support
ReplyDelete